Stripe
Introduction
Stripe offers credit card (and other) payment services; we at Zeleo use it for our payment processing, as do many other software companies. While Stripe provides an excellent and robust API, there are many corner cases that need to be handled when dealing with card payments that require a manual intervention- things like charge declines and disputes that really are difficult to automate in a software product. With Zeleo you can configure a process around these by sending tasks to employees, Slack messages, etc, when events occur. You could also just use Zeleo to let your team know when a person signs up for your service, or assign a support professional to followup with somone when an account is created. It really does provide an easy to way to handle a lot of the exeptional workflows when dealing with payment processing.
This document will walk you through getting Stripe set up with Zeleo and define what events are available. At the end we’ll even give you a few starter tips to get you rolling, but as always with Zeleo, we leave it up to you to come up with Zeleo use cases that are far better than anything we could think of!
Installation and Setup
There are a few steps you will need to take to get your Zeleo Team ready to receive and react to events from your Stripe Account.
First, add the Stripe Zeleo Application to your team by going to the Applications tab of your Manage Team dialog.
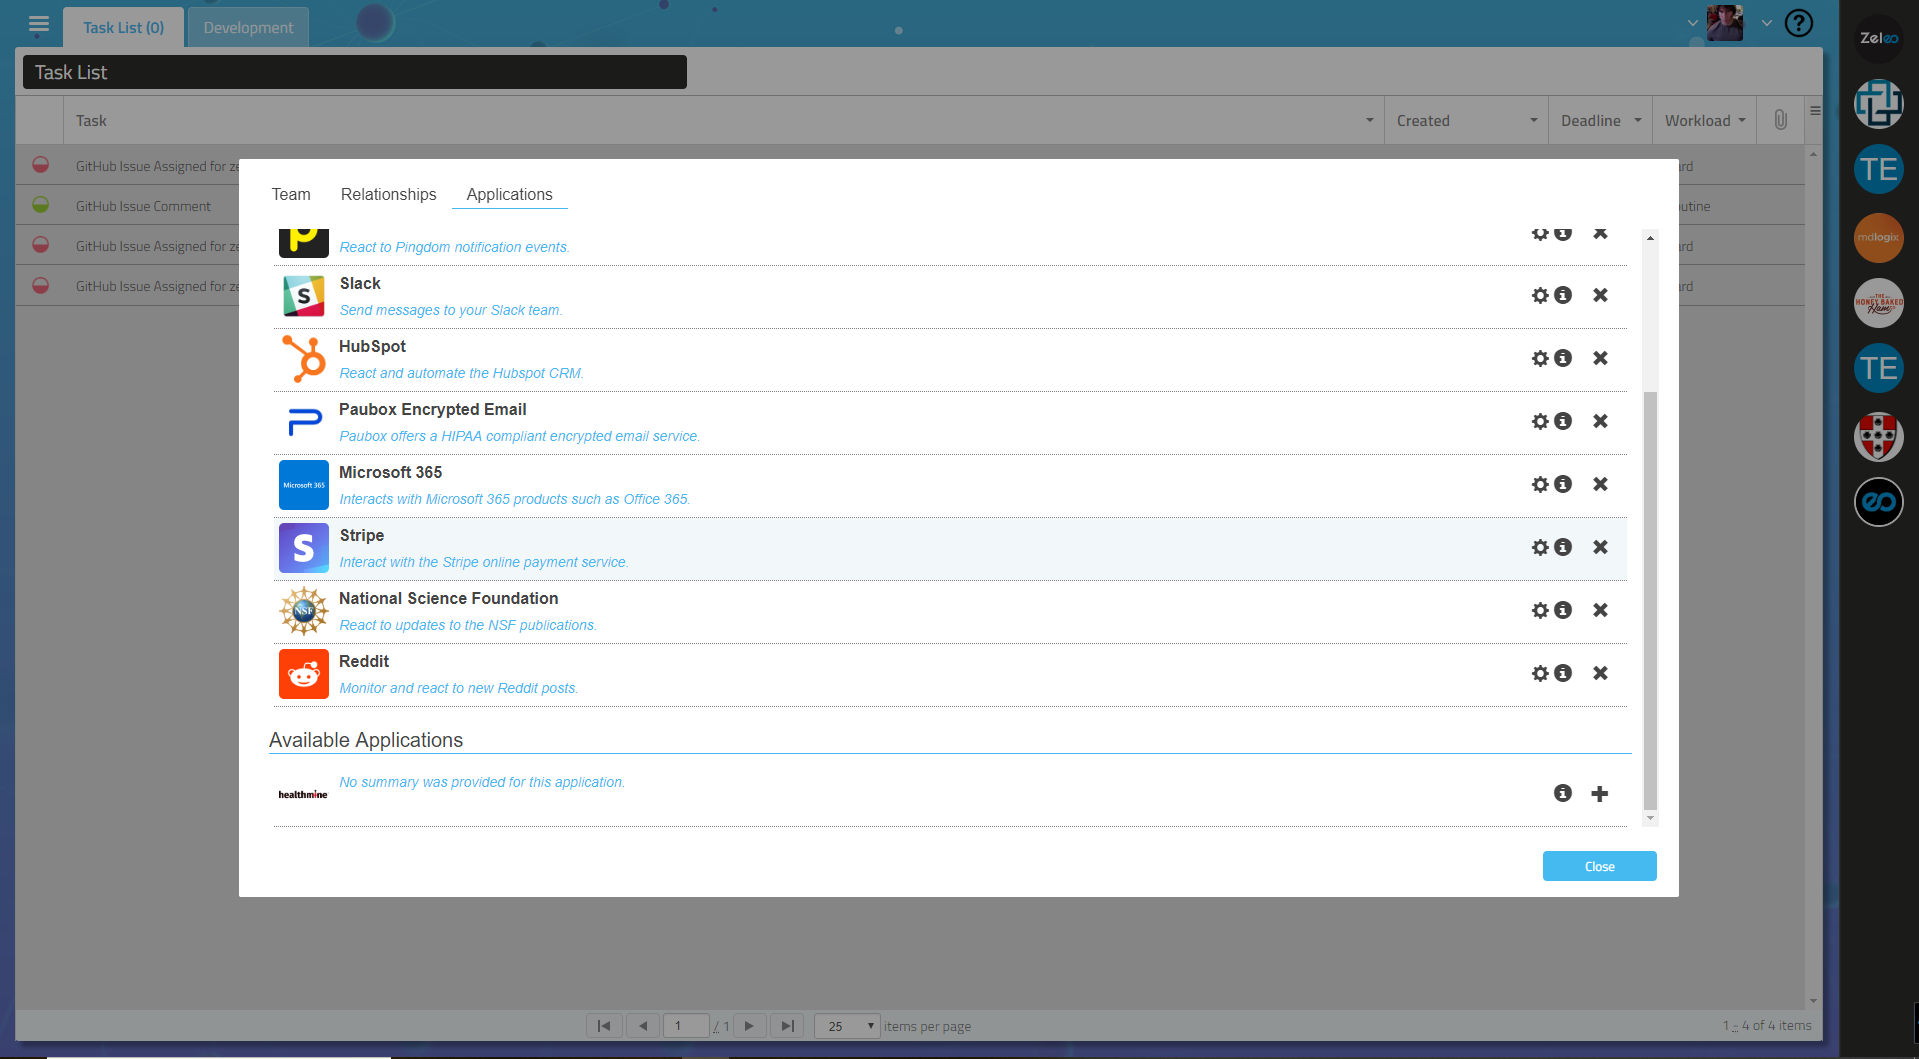
Hit the + icon next to the Stripe Application to add it to your team. You may need to upgrade your account or remove an Application if you have hit your Zeleo Application limit.
Then, Zeleo needs to know how to identify which events pertain to your Stripe Account.
Go to your Edit Profile dialog. You will see the following configuration options in your Applications Tab for Stripe.

You will need to enter both of these values. Start by adding the email address for your Stripe Account; this should match your login for Stripe.
Next, copy and paste the Account ID of your Stripe account. You can find this by selecting your profile from Stripe in the menu below.
Scroll to the bottom of the page and you will see your accounts listed, each with an identifier in the ID column. This string of characters is what you need to copy and paste into the configuration field.

Why does Zeleo need to know this? We need to be able to match incoming events with your account, and this is the best way to make sure this is correct. Please be careful with this account identification; you want to keep this private for your security.
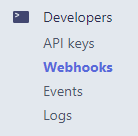
Finally, you will need to set up a Webhook in Stripe to send Zeleo events as necessary.
Start by selecting the Webhooks menu under the Developers section in your Stripe Dashboard. This is found on the left side of your Stripe Dashboard as seen here.
Click the Add Webhook to bring up the following dialog.
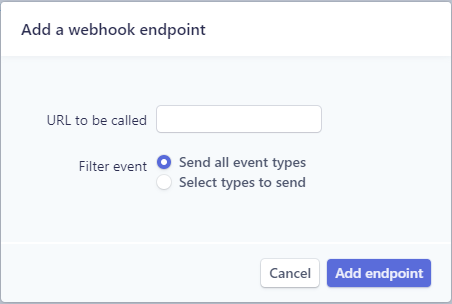
Paste the following URL into the field, replacing the {account id} with the Account ID you pasted into Zeleo in step 2.
https://g485ppz2x6.execute-api.us-east-1.amazonaws.com/prod/stripe/{account id}
Leave the radio button at Send all event types and save.
Now you’re all set! Zeleo will be sent events that we can now react to and handle as you see fit.
Conditions
You can configure Zeleo to react to the following events. Stay tuned- we are constantly adding more; please email support@zeleoinc.com to make a request! Each of these events offers a variety of fields that you can use to define your Condition tiggers!
- Customer Event
- Handle when a customer is added, removed, or updated in your account.
- Charge Event
- Reacts to any sort of charge, including declined cards, failed charges, etc.
- Dispute Event
- Fires when a charge dispute is created or updated.
Recommendations
Okay- this is all well and good, but what can you do with this Zeleo Application? Here are a couple of uses that we at Zeleo find useful and might for you as well. As always, Zeleo leaves the dreaming up to you, so these are just some ideas. Please let us know if you are using Zeleo and have some ideas for our community. @zeleoinc on Twitter.
Handle Declines and Disputes
With Stripe it is easy to automate payment processing and add premium features or subscriptions to your product. However, what happens when a card is declined, or if the user disputes a charge as incorrect? While you certainly could automate the handling of either to some extent, you will likely need a human being at some point in your process; that’s where Zeleo could come in handy.
Remember, Zeleo not only offers system integration, but includes task-based workflow natively; you could easily route a task to an employee to handle one of these cases. Tasks in Zeleo can also be set with an overdue duration, so you can assign the task to someone else, let a manager know, etc if one of these tasks becomes overdue.
Let’s start by creating a Task Template.
In the side panel, select Task Templates and hit the + symbol to create a new Task Template.
Give the new task a name, a display name, and type instructions. Instructions are HTML formatted, so you can change text colors, fonts, etc using the toolbar that appears when you are focused in the field. Also, since it is a template, you can hit the # key to see what variables are available to be replaced when the task is assigned, assuming the variable field exists in the triggering Condition event.
The following is an example task template if you are sending a task to en eomployee to follow-up with a custimer whose card is declined.
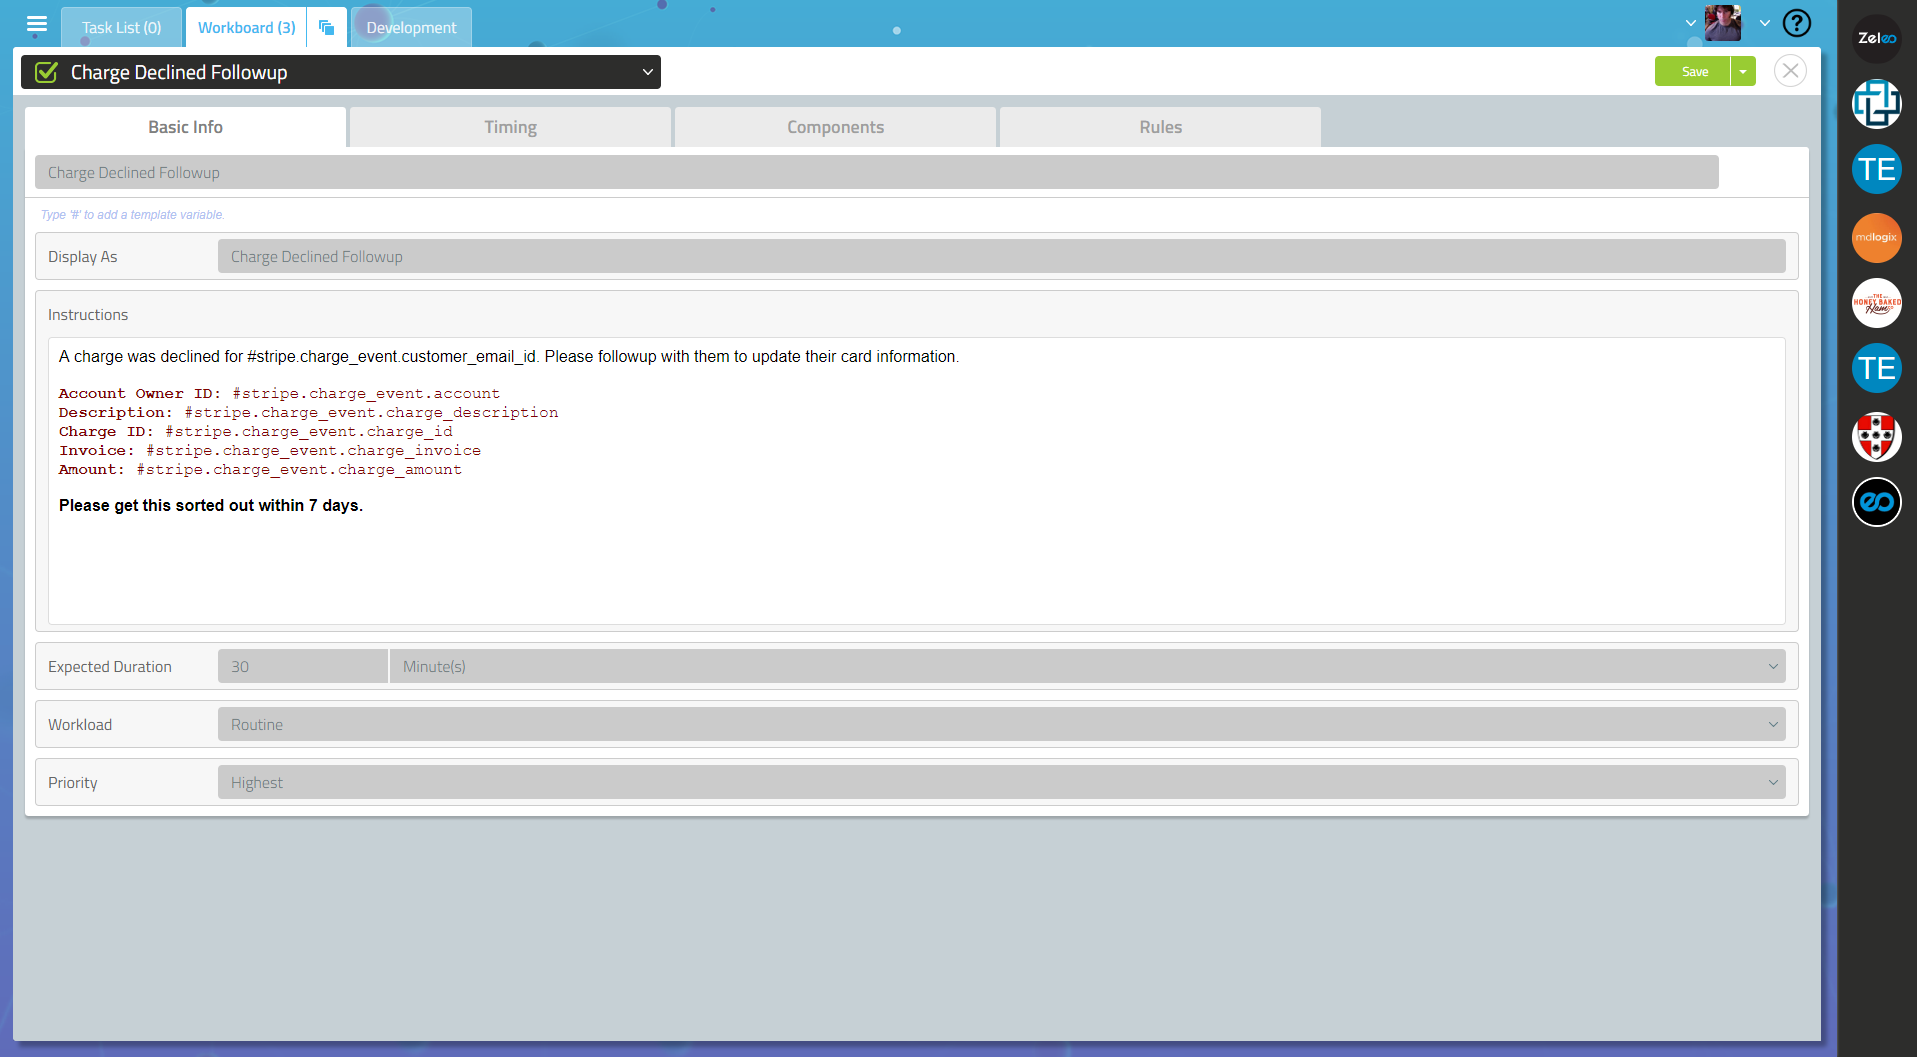
The body is as follows (without the HTML formatting):
A charge was declined for #stripe.charge_event.customer_email_id. Please followup with them to update their card information.

Account Owner ID: #stripe.charge_event.account
Description: #stripe.charge_event.charge_description
Charge ID: #stripe.charge_event.charge_id
Invoice ID: #stripe.charge_event.charge_invoice
Amount: #stripe.charge_event.charge_amount

Please get this sorted out within 7 days.
Now if you want to add a deadline, go to the Timing tab and set the task to Fail after a set duration. If you wanted to the task to expire in 7 days as we put in that template, it would look as follows:

You will need to identify who will get the Task as well.
Before we create the Rule, we need to make sure a Relationship is defined so we know to whom we will assign the task. This can also be done using Tags, but we’ll get into that in another example.
Start by opening the Manage Team dialog and selecting the Relationships tab. First we’ll define a Relationship Type by clicking the + symbol next to Relationship Types. Let’s say that if someone is a Support Representative of another, that other is the Support Manager of the first person. This should look as follows.
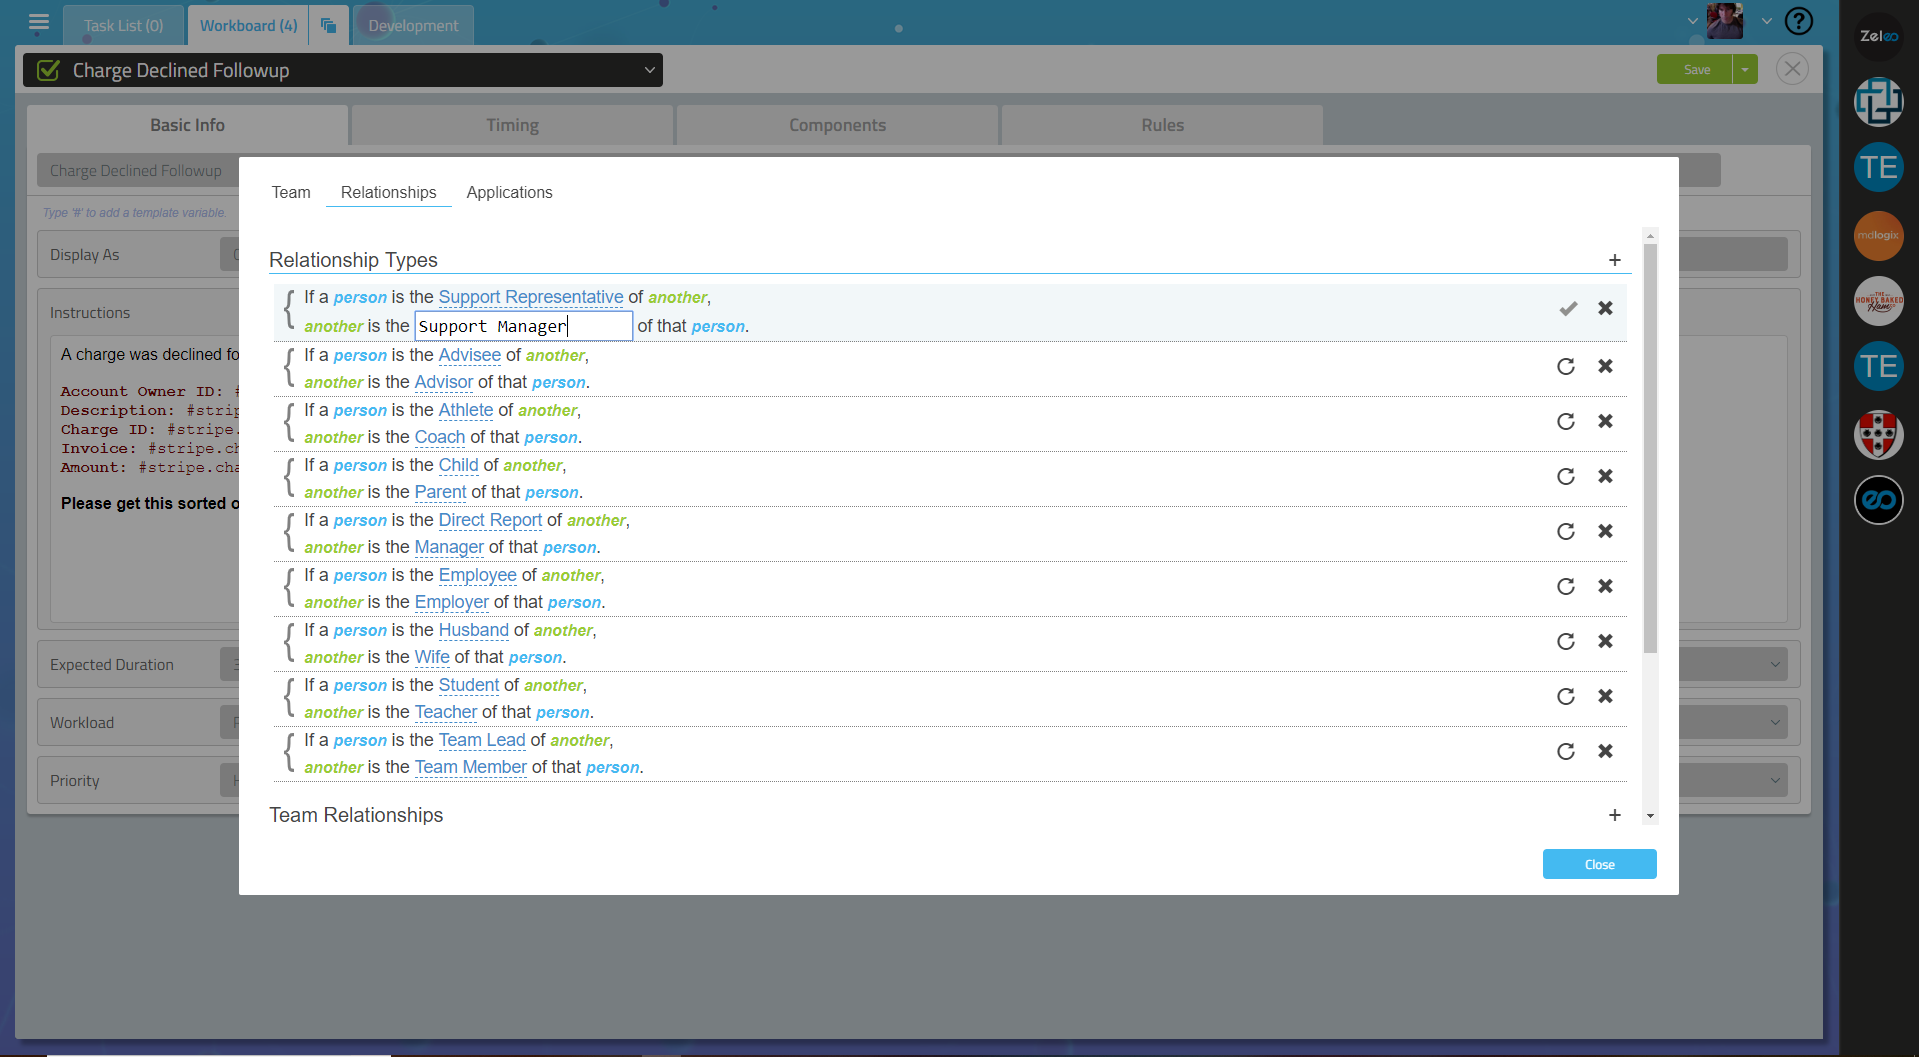
Remember to click the checkmark to the right of the line you just added to save it.
Now scroll down and let’s define a user as the Support Representative of you. This will clearly depend on your Zeleo Team users, but it should look like this before saving:
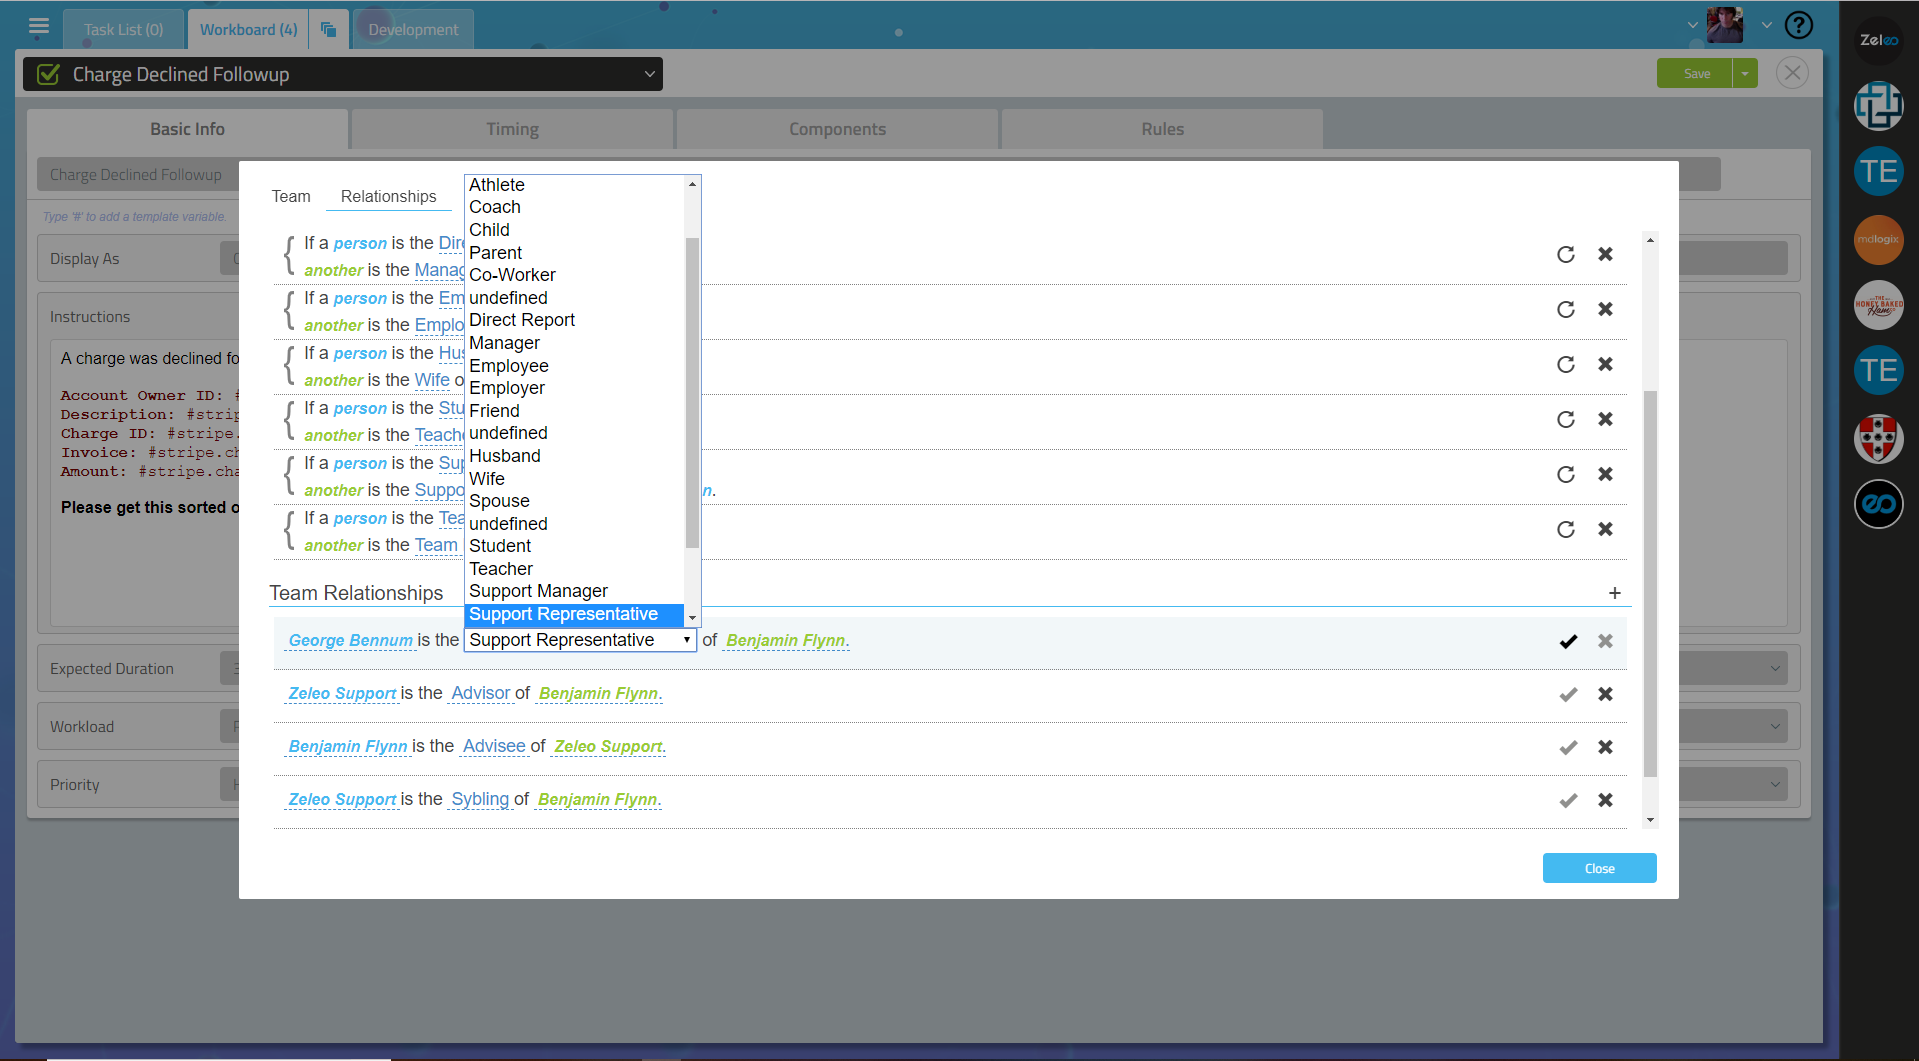
When you click the checkmark to save, the reciprocal will automatically be created; you will see two lines added to this dialog.
Wiring up the Rule
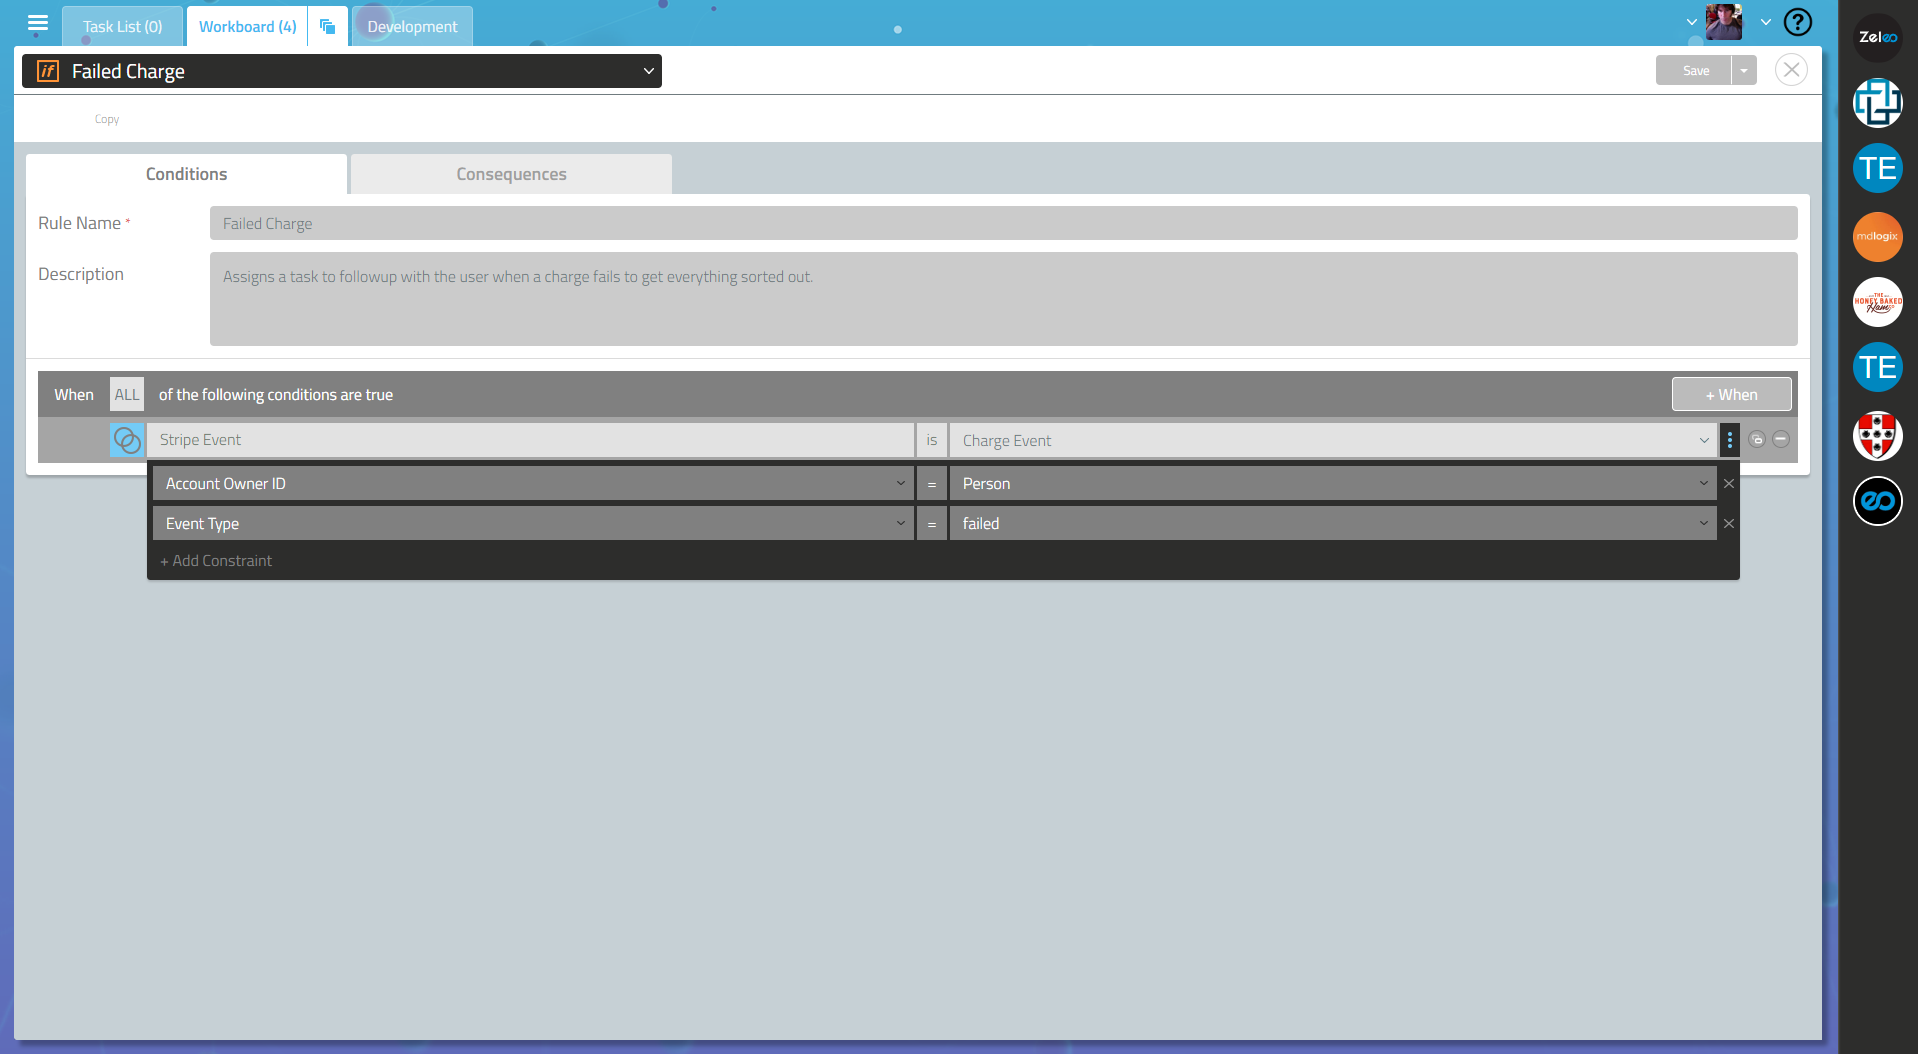
Okay, now let’s make things work. Go to your side panel again and hit the + button under the Rules and Conditions section.
In the Condition, select Stripe and choose Charge Event.
Click the vertical ellipses and select the Account Owner ID and set it to Person. This identifies the person who owns the Stripe account (you, if you added the Stripe Account ID to your profile in the Setup Section).
Now let’s add the Event Type field and select failed. This means we want to react when a charge is failed. Remember we can add in another condition to the rule if we want to handle other states as well; just click the + When buttont to add another condition statement.
This is just an example- look through the fields available to see what else is possible!
Your rule condition should look something like this:
Now in the Consequence tab, we want to assign the task.
Select Assign Task as the Consequence and select the Task Template you created at the beginning of this scenario.
In the Affiliated Record and Recipient fields, select Person's Support Representative.
Wait- what did that do? Remember when we created the Relationship between you and someone else on your team? Also remember we added the field into the Condition called Account Owned ID and set it to
Person? What that means is the Zeleo User with the Stripe Account in their profile (which you added to your account in the Setup section of this document) will be set as the Person and the Task will be assigned to anyone who is related to that Person by the type of Support Representative. If more than one Zeleo User is related to you by this Relationship Type, they would also receive this task as well. Make sense? If not, please email us at support@zeleoinc.com.
Okay- now save the Rule and you’re set! If you wanted to react to that task when/if it becomes overdue, you can create a new Rule and set a Condition where that Task Template you created enters a failure state. You could then assign a new task to Support Manager perhaps? Possibilities are endless, so you can customize your process!
Keep your Slack Team Notified
This is an easy one, but really useful. If you are creating a Stripe account for every new user, you can react to a Stripe User event and let your Slack Team know when someone signs up for your product. Maybe you want a support person to reach out when this happens? Assign a task to followup when someone creates an account as well!
Before you begin, make sure you have Slack added to your Zeleo Team and have at least one Slack Channel authorized. The Slack documentation for Zeleo is here.
Setting up the Communication.
We’ll start by creating the Communication Template. This will format the message that will be posted to your Slack channel. Open your side panel in Zeleo and select Communication Templates. Hit the + on the bottom to create a new Communication Template.
Give the template a name and select Email as the type (not SMS).
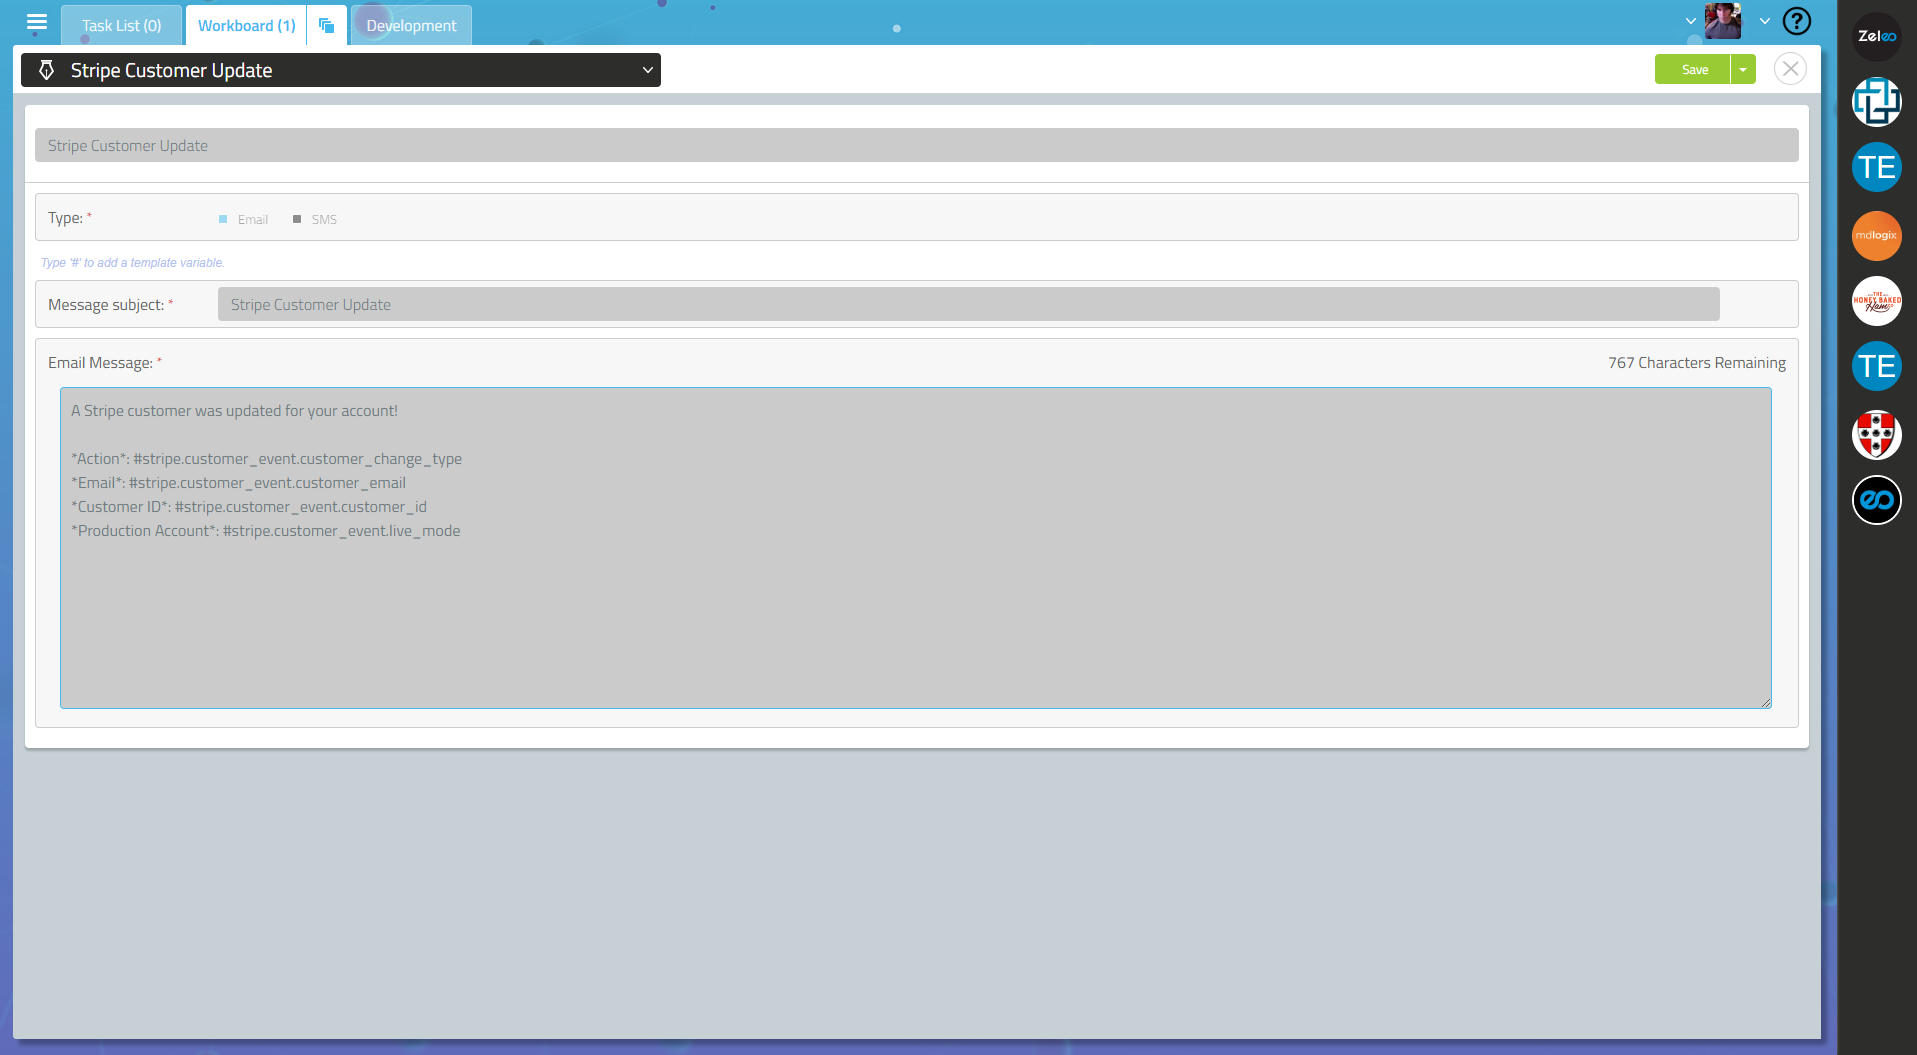
Now you will want to create the body of the message. Remember you can use Slack markdown formatting in this as well, so you can really customize the notification. Here’s a simple one that we use at Zeleo for all customer updates in Stripe. Also remember that you can hit # to bring up a list of template values that will be repleced by the event data if it exists.
A Stripe customer was updated for your account!

*Action*: #stripe.customer_event.customer_change_type
*Email*: #stripe.customer_event.customer_email
*Customer ID*: #stripe.customer_event.customer_id
*Production Account*: #stripe.customer_event.live_mode
Now your screen should look something like this:
Hit Save.
Authoring the Rule
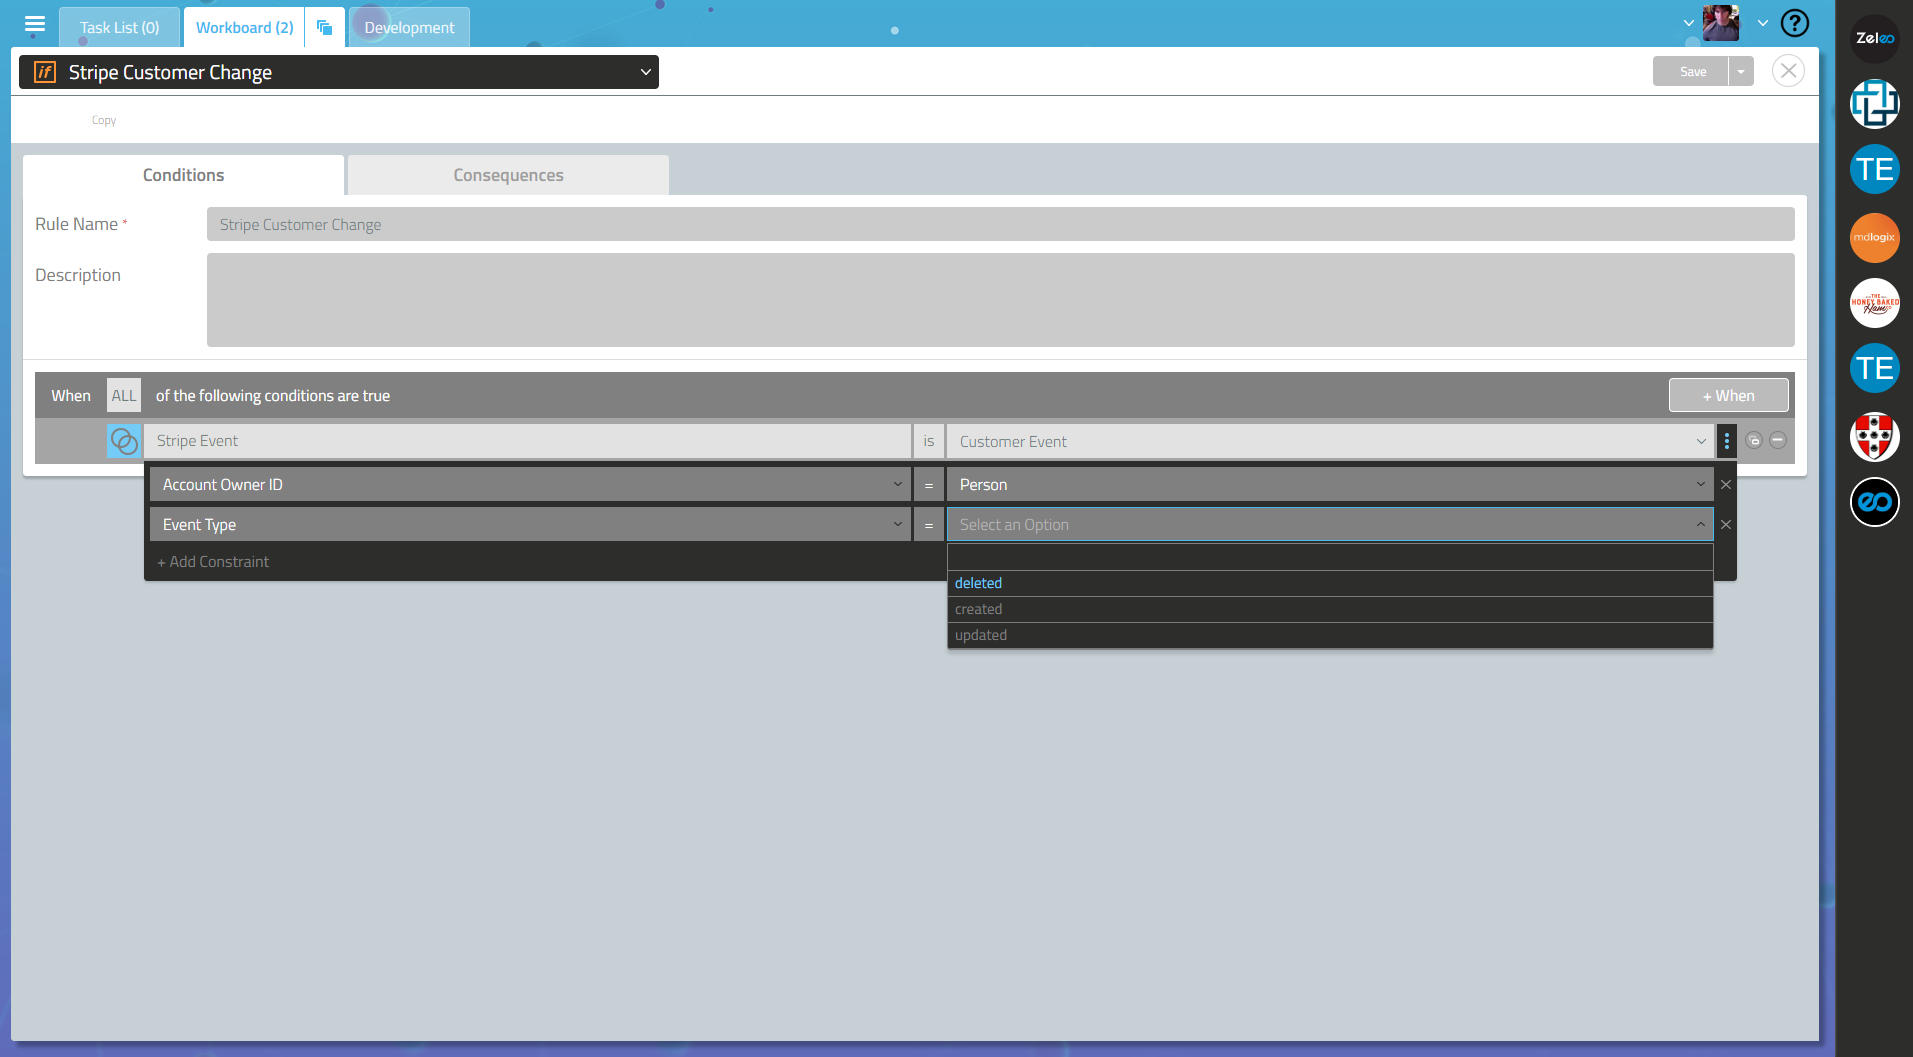
Now select Rules & Conditions from the side panel and hit + to create a new Rule. Give your new Rule a name and optionally a description.
Choose Stripe Event from the first dropdown and select Customer Event.
Then click the vertical ellipses, select Account Owner ID, and set it to Person. Zeleo needs a User who is the subject of each event, so this Person will be the person who has the Stripe Account ID tied with their account in step 2 of the Setup section. 90% of the time you will just want to set Account ID to Person. We will make that a default in a future update to Zeleo so you don’t have to worry about it.
Now if you leave the Condition as is, you will trigger the Consquence for every change to any customer. If you wish to filter and be more specific, add more fields. Event Type, for instance, will allow you to only listen for create events if you only want to handle new Customers.
Your Condition should look as follows:
Now click the Consequence tab. You will want to select Slack and Channel Notification for your Consequence. You could always add more than one Consequence if you wanted to send text messages, emails, tasks, etc.
Click the vertical ellipses on the right to add a couple of fields. First select Noticiation Template and choose the Communitation Template you made two steps ago.
Now add the Slack Channel field to define which channel you wish to post the notification. Remember this must be one you authorized when setting Slack up with Zeleo. Your Consequence should look like this:

Save your Rule.
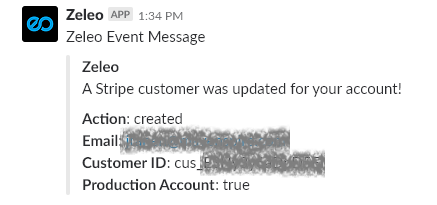
Now when you have a user sign up, update their account, etc (as you configured it) the following will show up in your Slack channel!
Again, please let us know if you think of other ways to levarage the power of Zeleo. New Zeleo Applications are added constantly, and you can create your own if you prefer (see the development section of this site on the left). Feel free to email us, Tweet at us, hit us up on Facebook- we love all feedback and ways to make the product more useful!